Prerequisites
- Cursor, VS Code, or VS Code with Claude Code installed (latest version recommended)
- Credible organization set up by an admin
- Database connections configured — Your organization admin should have set up connections to your data sources. See Connect to Your Data.
What the Credible Extension Provides
The Credible Extension configures your IDE workspace with everything the agent needs for semantic modeling:- Credible-Modeling MCP server — An environment-scoped MCP server that gives the agent access to your data warehouse metadata, so it can discover tables, suggest modeling approaches, and look up Malloy syntax
- Modeling skills — Slash commands (e.g.,
/malloy-model,/malloy-discover,/credible-publish) that guide the agent through common workflows. The agent uses these automatically based on context - Cursor rules — Malloy-aware coding rules that help the agent write correct Malloy syntax and follow best practices
- Managed database connections — Access connections configured in the Credible App without storing credentials locally
- Credible Service Panel — Browse your organization’s environments, connections, and published packages
- Syntax highlighting & compilation checks for
.malloy,.malloynb, and.malloysqlfiles - Schema | Explore | Preview buttons above any source definition
- Run | Show SQL buttons above any query or run statement
Installation
Install the Credible Extension & Log In
- In Cursor or VS Code, go to the Extensions view (
Cmd+Shift+Xon Mac,Ctrl+Shift+Xon Windows/Linux), search for Credible, and install the extension — select Auto Update when prompted - Open the Explorer (
Cmd+Shift+Eon Mac,Ctrl+Shift+Eon Windows/Linux), expand the Credible panel at the bottom of the sidebar, and click Login — then follow the steps in your browser - Back in your IDE, select your organization from the list (if you only belong to one, it’s selected automatically), then select your environment
Credible-Modeling MCP Server
The Credible Extension registers an environment-scoped Credible-Modeling MCP server automatically — no manual enabling required. In Cursor, the extension registers the server programmatically; in VS Code, it writes a workspace-scoped.vscode/mcp.json config.
- Cursor
- VS Code
- Claude Code
The server is enabled automatically. To verify, open Cursor Settings (
Cmd+Shift+J on Mac, Ctrl+Shift+J on Windows/Linux) → Tools & MCP. The server appears as extension-Credible-Modeling — Cursor uses this naming convention to indicate it was registered by an extension.If the agent can’t call MCP tools, reload the window (Cmd+Shift+P → “Reload Window”).Credible Service Panel
The Credible Service Panel shows your organization’s structure. Find it at the bottom of the Explorer view (Cmd+Shift+E on Mac, Ctrl+Shift+E on Windows/Linux):
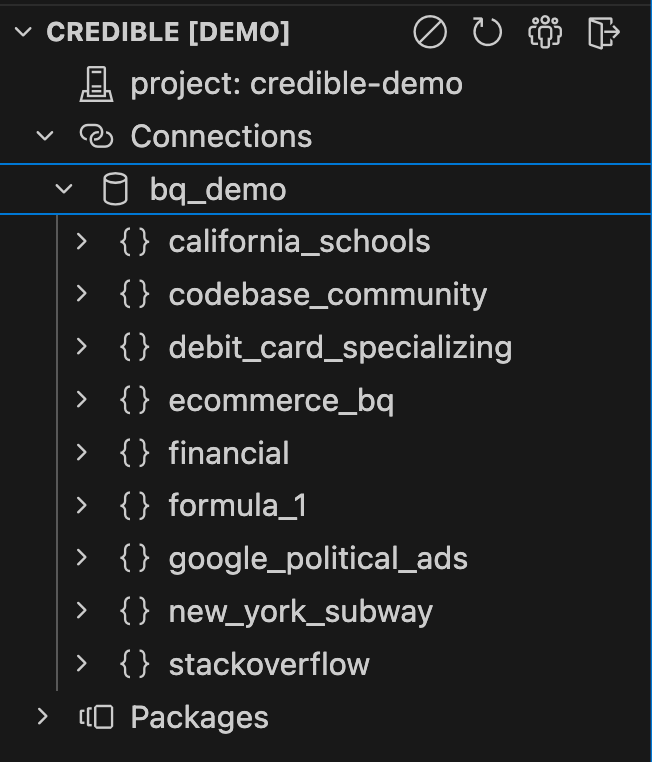
- Environments: Logical groupings of related packages and connections
- Connections: Managed database connections (no local credentials needed)
- Packages: Published semantic models with version history
Don't see the Credible Service panel?
Don't see the Credible Service panel?
The sidebar may be hidden by default in Cursor:
- Open the Explorer panel (
Cmd+Shift+E) (orCtrl+Shift+Eon Windows/Linux) - Look for the Credible panel at the bottom of the explorer sidebar
Panel controls
Panel controls
The Credible Extension can be configured via the Command Palette (
Cmd+Shift+P) or clicking icons in the Credible Service panel:- Disable Credible: Turn off the extension for this workspace
- Refresh: Reload environments, connections, and packages
- Select Organization: Choose from your available organizations (auto-selects if you only belong to one)
- Sign Out: Log out of Credible
Next Steps
AI-Assisted Modeling
Build semantic models with AI-assisted modeling
Malloy Notebooks
Create data stories and documentation