> ## Documentation Index
> Fetch the complete documentation index at: https://docs.credibledata.com/llms.txt
> Use this file to discover all available pages before exploring further.
# Local Development
> Set up your IDE and coding agents
Build semantic models with whichever IDE and coding agent you prefer — Credible supports **Cursor**, **VS Code**, and **Claude Code** (running in VS Code), and works with the agent of your choice. The Credible Extension connects your IDE to the Credible platform, giving your agent the tools and context it needs to help you build, validate, and publish semantic models.
Local development runs on an **open stack** — the MCP (Model Context Protocol) tools and agent skills your coding agent uses are open source in Malloy Publisher. See [Built on Open Source](#built-on-open-source) below.
The steps below use Cursor as the example, but the same workflow applies to the other IDEs and agents.
**Prefer zero setup?** You can also [build in the app](/how-to/modeling/in-app-development) — entirely in your browser, no IDE required. It's the fastest way to get started and best for more business-savvy, less-technical users; local development is best for engineers who want Git-based workflows and direct control over files. Both produce the same governed packages.
## Prerequisites
* **Cursor**, **VS Code**, or **VS Code with Claude Code** installed (latest version recommended)
* **Credible organization** set up by an admin
* **Database connections configured** by your admin — see [Connect a Database](/how-to/modeling/connect-data)
## What the Credible Extension Provides
The Credible Extension configures your IDE workspace with everything the agent needs for semantic modeling:
* **Credible-Modeling MCP server** — An environment-scoped MCP server that gives the agent access to your data warehouse metadata, so it can discover tables, suggest modeling approaches, and look up Malloy syntax
* **Modeling skills** — Slash commands (e.g., `/malloy-model`, `/malloy-discover`, `/credible-publish`) that guide the agent through common workflows. The agent uses these automatically based on context
* **Agent rules** — Malloy-aware coding rules that help your agent write correct Malloy syntax and follow best practices
* **Managed database connections** — Access connections configured in the Credible App without storing credentials locally
* **Credible Service Panel** — Browse your environment and its managed connections, down to individual schemas and tables
Installing the Credible Extension also installs the [Malloy extension](https://docs.malloydata.dev/documentation/setup/extension), which provides:
* **Syntax highlighting & compilation checks** for `.malloy`, `.malloynb`, and `.malloysql` files
* **Schema | Explore | Preview buttons** above any source definition
* **Run | Show SQL buttons** above any query or run statement
## Built on Open Source
The tools and skills your agent uses locally are not a black box. Credible contributed its MCP tools and agent skills to [Malloy Publisher](https://github.com/malloydata/publisher), the open-source server for Malloy models: retrieval tools that let an agent look up what your model actually defines, and skills encoding the discipline to use them well — query patterns, gotchas that trip up frontier models, and the rigor that separates a real answer from a plausible one. Every skill is readable in the open; fork them, or extend them with your organization's institutional knowledge. Read the full story in [We Open Sourced the Thing Everyone Else Is Selling](https://credibledata.com/blog/posts/open-sourcing-skills).
## Installation
### Install the Credible Extension & Sign In
1. In Cursor or VS Code, go to the Extensions view (`Cmd+Shift+X` on Mac, `Ctrl+Shift+X` on Windows/Linux), search for **Credible**, and install the extension — select **Auto Update** when prompted
2. Open the Explorer (`Cmd+Shift+E` on Mac, `Ctrl+Shift+E` on Windows/Linux), expand the **Credible** panel at the bottom of the sidebar, and click **Sign In** — then follow the steps in your browser
3. Back in your IDE, select your organization from the list (if you only belong to one, it's selected automatically), then select your environment
### Credible-Modeling MCP Server
The Credible Extension registers an environment-scoped **Credible-Modeling** MCP server automatically — no manual enabling required. In Cursor, the extension registers the server programmatically; in VS Code, it writes a workspace-scoped `.vscode/mcp.json` config.
To verify, open Cursor Settings (`Cmd+Shift+J` on Mac, `Ctrl+Shift+J` on Windows/Linux) → **Tools & MCP**. The server appears as **extension-Credible-Modeling** — Cursor uses this naming convention to indicate it was registered by an extension.
To verify, open the Command Palette (`Cmd+Shift+P` on Mac, `Ctrl+Shift+P` on Windows/Linux) and run **"MCP: List Servers"** — you should see **Credible-Modeling** in the list.
When you start Claude Code in your workspace, you'll be prompted to allow Claude Code to run in the directory and to accept the **Credible-Modeling** MCP server. Accept both. Use `/mcp` at any time to view and manage your MCP servers.
Every time you change environments, the extension updates the MCP config automatically. If the agent can't call MCP tools, reload the window (`Cmd+Shift+P` → "Reload Window").
## Credible Service Panel
The **Credible Service Panel** shows your current environment and its connections. Find it at the bottom of the Explorer view (`Cmd+Shift+E` on Mac, `Ctrl+Shift+E` on Windows/Linux):
The Credible Service Panel is part of the IDE extension, so it's available in Cursor and VS Code only. If you use Claude Code from the terminal, manage your environment with the [CLI](/platform-admin/cli) or the Credible App instead.
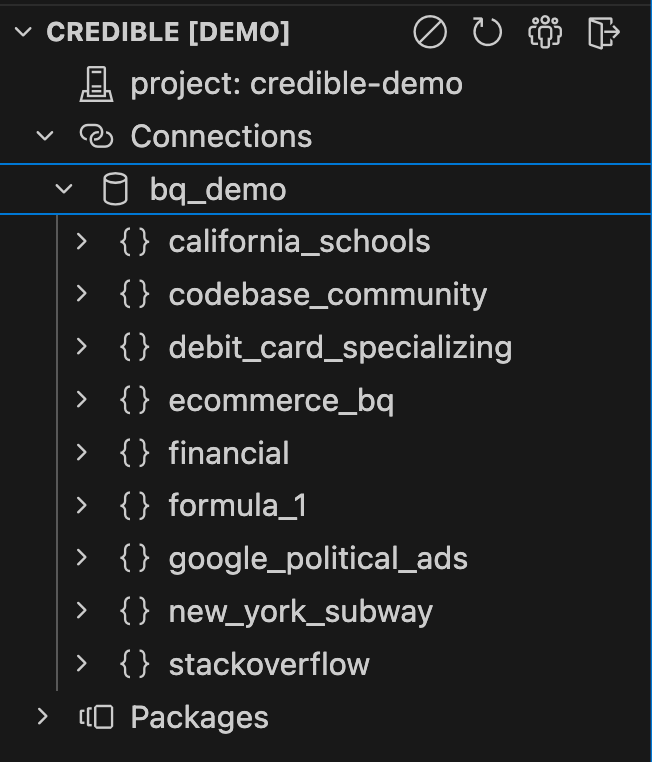 Here you can view:
* **Your current environment** — click it to switch environments
* **Connections**: Managed database connections in the environment — expand one to browse its schemas and tables
The extension automatically discovers connections in your environment, eliminating the need to store database credentials locally.
The sidebar may be hidden by default in Cursor:
1. Open the **Explorer** panel (`Cmd+Shift+E`) (or `Ctrl+Shift+E` on Windows/Linux)
2. Look for the **Credible** panel at the bottom of the explorer sidebar
The Credible Extension can be configured via the Command Palette (`Cmd+Shift+P`) or clicking icons in the Credible Service panel:
* **Disable Credible**: Turn off the extension for this workspace
* **Refresh**: Reload your environment and its connections
* **Select Organization**: Choose from your available organizations (auto-selects if you only belong to one)
* **Sign Out**: Log out of Credible
## Embed Data Files
You can include CSV or Parquet files directly in your packages. When you publish your package, these data files are published along with your models and become queryable via DuckDB.
Embedding data files in your packages is valuable when you need to:
* **Package sample data** - Example datasets for testing or demos
* **Build standalone models** - Models that don't require database connections
* **Version control data** - Keep data synchronized with model changes in your package
Currently, embedded data files work best for standalone models. Support for querying embedded data alongside database connections (e.g., joining embedded lookup tables with warehouse data) is coming soon.
### File Structure
Create a `data/` folder in your package directory and add your files — CSV (`.csv`, with a header row) or Parquet (`.parquet`, more efficient for larger datasets):
```
my-package/
├── publisher.json
├── ecommerce.malloy
└── data/
├── country_codes.csv
├── product_categories.parquet
└── exchange_rates.csv
```
### Referencing Embedded Data in Models
Use `duckdb.table()` to reference embedded files in your Malloy models — the same syntax works for CSV and Parquet:
```malloy theme={null}
source: country_codes is duckdb.table('data/country_codes.csv') extend {
dimension:
country_code is code
country_name is name
region is geographic_region
}
```
## Next Steps
Build semantic models with AI-assisted modeling
Create data stories and documentation
Here you can view:
* **Your current environment** — click it to switch environments
* **Connections**: Managed database connections in the environment — expand one to browse its schemas and tables
The extension automatically discovers connections in your environment, eliminating the need to store database credentials locally.
The sidebar may be hidden by default in Cursor:
1. Open the **Explorer** panel (`Cmd+Shift+E`) (or `Ctrl+Shift+E` on Windows/Linux)
2. Look for the **Credible** panel at the bottom of the explorer sidebar
The Credible Extension can be configured via the Command Palette (`Cmd+Shift+P`) or clicking icons in the Credible Service panel:
* **Disable Credible**: Turn off the extension for this workspace
* **Refresh**: Reload your environment and its connections
* **Select Organization**: Choose from your available organizations (auto-selects if you only belong to one)
* **Sign Out**: Log out of Credible
## Embed Data Files
You can include CSV or Parquet files directly in your packages. When you publish your package, these data files are published along with your models and become queryable via DuckDB.
Embedding data files in your packages is valuable when you need to:
* **Package sample data** - Example datasets for testing or demos
* **Build standalone models** - Models that don't require database connections
* **Version control data** - Keep data synchronized with model changes in your package
Currently, embedded data files work best for standalone models. Support for querying embedded data alongside database connections (e.g., joining embedded lookup tables with warehouse data) is coming soon.
### File Structure
Create a `data/` folder in your package directory and add your files — CSV (`.csv`, with a header row) or Parquet (`.parquet`, more efficient for larger datasets):
```
my-package/
├── publisher.json
├── ecommerce.malloy
└── data/
├── country_codes.csv
├── product_categories.parquet
└── exchange_rates.csv
```
### Referencing Embedded Data in Models
Use `duckdb.table()` to reference embedded files in your Malloy models — the same syntax works for CSV and Parquet:
```malloy theme={null}
source: country_codes is duckdb.table('data/country_codes.csv') extend {
dimension:
country_code is code
country_name is name
region is geographic_region
}
```
## Next Steps
Build semantic models with AI-assisted modeling
Create data stories and documentation